Introduction and Basics of Puff Pastry
Introduction to Puff Pastry
Puff pastry, with its delightful layers, is a staple in both sweet and savory dishes. From the delicate folds of a croissant to the crisp edges of a strudel, the versatility of puff pastry is unmatched. Here, we’ll delve into the basic components that make up puff pastry, giving you a solid foundation to start your baking adventure.
Understanding the Ingredients
The secret to perfect puff pastry isn’t just in the technique—it starts with the ingredients. Each component plays a crucial role in how well your pastry puffs.
Flour: Types and their impacts
The type of flour can make or break your puff pastry. All-purpose flour is commonly used because it provides the right balance of gluten, which is essential for the dough’s elasticity. High-gluten flours can make the dough too tough, while low-gluten flours may not provide enough structure.
Fats: Butter vs. Margarine
Butter is the fat of choice for puff pastry because of its flavor and the ability to create distinct, flaky layers. The quality of butter is paramount; higher fat content means better flakiness. Margarine can be used, but it often lacks the flavor and melt-in-your-mouth texture that butter delivers.
The role of cold water
Cold water helps to keep the butter firm and prevents the gluten in the flour from developing too early. This ensures that the dough remains manageable and that the layers are distinct after baking.
Optional ingredients: Salt, sugar, and acids
Salt enhances flavor, sugar can add a subtle sweetness, and acids like lemon juice or vinegar can help tenderize the gluten, making the dough easier to roll out and fold.
Equipment Needed
To make puff pastry, you don’t need fancy gadgets, but a few basic tools will make the process smoother.
Essential tools: Rolling pin, mixer, etc.
A good rolling pin is essential for evenly rolling out the dough, and a mixer, though not mandatory, can speed up the initial mixing of the dough.
Optional tools: Dough scraper, pastry brush
A dough scraper can help cleanly lift and fold the dough, while a pastry brush is useful for applying egg washes without deflating the layers.
In the next section, we’ll dive into the steps of preparing the dough and the crucial process of lamination, which is where the real magic happens to make your baking rise to the occasion. For more detailed insights on choosing the right type of flour for your baking needs, check out King Arthur Flour Baking Guide.
Step-by-Step Guide to Making Puff Pastry
Preparing the Dough (Détrempe)
The foundation of puff pastry is the détrempe, a simple mixture that starts the magical process of creating those hundreds of flaky layers. Let’s roll up our sleeves and get into the nitty-gritty of dough preparation.
Mixing methods: By hand or mixer
While a mixer can combine your ingredients quickly, mixing by hand allows for more control and prevents overworking the dough. Start by combining your flour and cold pieces of butter. The goal here is to coat the butter with flour without fully integrating the two, as those chunks of butter are what will later steam up during baking to form the layers.
Importance of temperature control
One crucial tip—everything should be cold! If the butter starts to melt before baking, it will integrate into the flour, leading to a dense pastry rather than a flaky one. If you notice your dough warming up, don’t hesitate to pop it into the fridge to chill.
Resting and chilling times
After mixing, let your dough rest. This relaxation time allows the gluten strands to align and the moisture to distribute evenly, making the dough more pliable and less likely to shrink when rolled out. A minimum of an hour’s rest in the refrigerator is typical, though some recipes recommend longer.
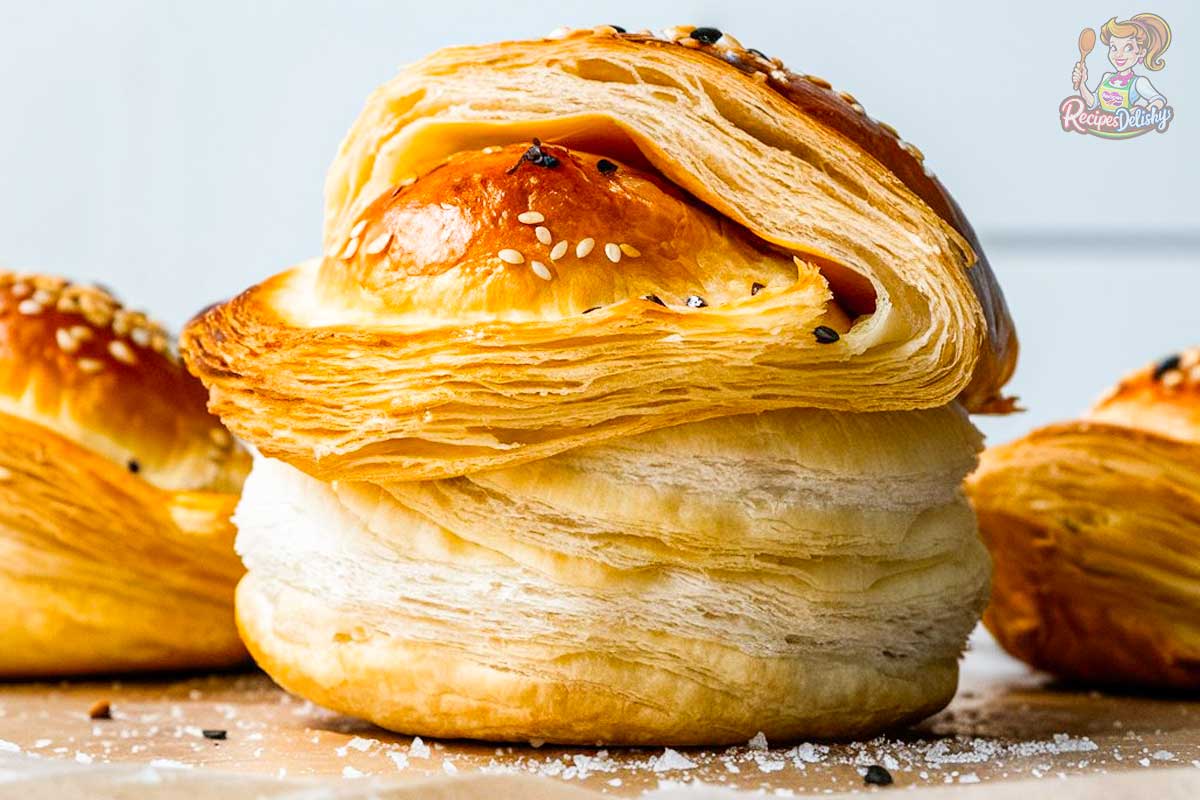
Laminating the Dough
Lamination is the process that truly distinguishes puff pastry from other types. It involves folding and rolling the dough multiple times to create thin layers of butter trapped between the dough.
Butter block preparation
Begin by preparing a butter block, which is essentially butter that has been shaped into a flat rectangle and chilled. This block is then enveloped within the détrempe.
The folding techniques: Single fold vs. book fold
There are several folding techniques, but the most common are the single fold and the book fold. The single fold, often called a three-fold, involves folding the dough in three like a letter. The book fold is more complex, folding each end to the middle and then folding in half again, resulting in four layers.
Repeating the folds: Achieving multiple layers
Each time you fold and roll the dough, you multiply the layers. Traditional puff pastry requires up to six folds, which can create over a thousand separate layers. Patience here is key—rushing can lead to tearing or squishing the layers, which impedes their ability to rise.
Rolling and Shaping
Once your layers are in place, the final rolling and shaping begin. This stage is where your pastry starts to take on its final form, whether it’s for turnovers, tarts, or vol-au-vents.
Techniques to maintain even thickness
Consistency is crucial. Use gentle but firm pressure to roll out your dough to an even thickness. This ensures uniform cooking and puffing.
Tips to prevent the dough from sticking
Liberal flouring of both the work surface and the rolling pin can prevent sticking without adding too much flour to the dough. If the dough does start to stick, chill it again briefly to firm up the butter.
Shaping variations for different pastries
The shape of your pastry depends on its end use. For example, squares or rectangles are great for tarts, while circles are perfect for top crusts on pies.
By mastering these steps, you’re well on your way to creating bakery-quality puff pastry at home. In the next part, we’ll cover how to bake your pastry to golden perfection, and troubleshoot common issues that might pop up along the way.
Baking and Troubleshooting
Baking the Puff Pastry
Now that your dough is layered and shaped, it’s time to bake it to that perfect golden crispness. Here’s how to ensure your puff pastry puffs up beautifully and cooks evenly.
Oven preparation: Temperature and positioning
Always preheat your oven to the temperature specified in your recipe—usually between 400°F and 425°F. This high heat is crucial as it turns the water in the butter into steam quickly, causing the pastry to puff. Positioning is also key; center your baking sheet in the oven to promote even heat distribution.
Baking times and how to tell when it’s done
Baking times can vary depending on the size and thickness of your pastry, typically ranging from 15 to 25 minutes. You know your pastry is done when it has risen significantly, and sports a golden-brown color. Feel free to open the oven and gently lift one to check the bottom—if it’s nicely browned, it’s likely ready.
Common issues: Pastry not puffing, uneven rise
If your pastry isn’t puffing up, it could be due to the dough getting too warm before baking, which melts the butter and prevents the formation of separate layers. An uneven rise often results from inconsistent rolling or uneven oven temperature. If the pastry puffs more on one side, it might also be due to how it was placed on the baking sheet. For a deeper understanding of what might be going wrong, check out What Things Should We Avoid With Puff Pastry? for detailed guidance on common pitfalls and how to avoid them.
Advanced Tips and Variations
Mastering puff pastry is just the beginning. With a few tweaks, you can customize your pastries for any occasion.
Adjustments for high altitudes
At high altitudes, increase the oven temperature by 15-25 degrees and decrease baking time to prevent drying out the pastry.
Flavor variations: Sweet and savory twists
Experiment with adding spices or zest to the dough for sweet versions, or finely chopped herbs for savory treats. These small additions can be mixed into the détrempe or sprinkled between layers for subtle flavoring.
Making ahead and storage tips
Puff pastry can be frozen either raw or baked. To use frozen dough, thaw it overnight in the refrigerator, not at room temperature. Baked puff pastry should be cooled completely before freezing and can be crisped up again in a warm oven.
Creative Uses for Puff Pastry
Now that you’ve mastered the basics of making puff pastry puff up, let’s explore some creative ways to use this versatile dough. From classic French desserts to inventive appetizers, puff pastry can be the star of any meal.
Puff Pastry in Desserts
One of the most delightful ways to use it is in desserts. Classic options include making a base for fruit tarts, where the flaky layers provide a crisp contrast to the soft fruit and creamy fillings. Turnovers are another popular choice; fill them with apple, cherry, or even sweet cheese fillings before baking to golden perfection.
Savory Applications
It’s not just for sweets. It also shines in savory dishes. Consider using it for pot pies, where the pastry covers a rich, savory filling of chicken or vegetables. Or, fashion your dough into elegant vol-au-vents that can be filled with anything from mushroom ragout to shrimp salad.
Inventive Appetizers
For parties, puff pastry can be turned into a variety of appetizers that are as easy to make as they are impressive. Cheese straws or twisted with herbs and spices make for a simple yet delicious treat. Mini puff pastry pizzas topped with gourmet ingredients like prosciutto and arugula or caramelized onions and blue cheese can elevate your appetizer game.
Fusion Dishes
Embrace culinary creativity by integrating puff pastry into fusion dishes. Imagine a puff pastry samosa, filled with a traditional spicy potato and pea mixture, or a dessert ravioli, where puff pastry encloses a sweet filling like chocolate hazelnut or pumpkin spice.
With puff pastry, the possibilities are nearly endless. It serves as a blank canvas for your culinary creativity, allowing you to experiment and craft dishes that are uniquely yours. Whether you’re planning a high tea or a cozy family dinner, incorporating puff pastry into your menu can add a touch of elegance and surprise.
Seasonal and Holiday Specials with Puff Pastry
Puff pastry is a fantastic ingredient that can be transformed to suit any season or holiday, offering endless possibilities to impress your guests with minimal effort. Let’s explore how you can tailor your puff pastry creations to celebrate different occasions throughout the year.
Festive Holiday Treats
During the holidays, puff pastry can be used to add a touch of elegance to traditional dishes. For Christmas, consider making star-shaped pastry appetizers filled with fig jam and goat cheese, or create a wreath-shaped centerpiece stuffed with seasoned meat or vegetables. For Hanukkah, puff pastry dreidels filled with chocolate or fruit preserves can be a fun and festive treat.
Halloween and Fall Celebrations
In autumn, incorporate seasonal flavors into your puff pastry dishes. Pumpkin spice turnovers, apple-pear galettes, or savory pastries filled with butternut squash and sage make perfect additions to any fall table. For Halloween, spooky-shaped pastries such as ghost and bat turnovers filled with sweet or savory fillings can be a hit at parties.
Spring and Easter Delights
Springtime and Easter offer opportunities to use fresh, bright ingredients. Asparagus spears wrapped in puff pastry with a touch of parmesan make a simple yet sophisticated side dish. For a sweet Easter treat, pastries filled with lemon curd and dusted with powdered sugar can brighten up any brunch table.
Summer Picnics and Gatherings
For summer, lighter puff pastry options are ideal. Consider using puff pastry to make tartlets filled with fresh berries and cream or savory versions with tomato, basil, and mozzarella for a twist on the classic caprese salad. Puff pastry pinwheels with pesto and cheese are easy to make and perfect for picnics.
Each season brings its own unique flavors and opportunities for creativity with puff pastry. By adapting your recipes to incorporate seasonal ingredients and holiday-themed shapes, you can make your puff pastry dishes a central part of your celebrations all year round.
FAQs
How to fix dough that won’t puff?
Ensure your butter is cold and the oven is hot enough. Avoid rolling the dough too thin or overworking it, as this can destroy the layers.
Can I use gluten-free flour?
Yes, but expect a difference in texture. Gluten-free flours often require a binding agent like xanthan gum to help replicate the structure gluten provides.
How to make puff pastry faster?
For a quicker version, try the “blitz” method, which involves fewer folds and a bit more mixing at the start. This won’t rise as much as traditional puff pastry but is a great alternative when time is tight.
With these insights and tips, you’re well-equipped to tackle the art of puff pastry. Remember, practice makes perfect, and each batch will bring you closer to mastering those flaky, buttery layers. For a visual guide and more advanced techniques, explore Serious Eats Food Lab for in-depth discussions and step-by-step videos.
Conclusion